
To solve a hidden achievement in Forever Ago, reveal its description in your platform's achievement list and match it to a concrete action. Listening to Milton, taking a selfie with him, losing Alfred's hat, and progressing through the journey each need a different approach. A concealed description does not mean every entry is a secret collectible or that it is permanently missable.
Use the hidden entries displayed by your platform as your checklist. The sections below explain their task conditions alongside related photography and exploration requirements; they are not an exhaustive platform-specific list of hidden flags.
The requirements below include achievement spoilers but avoid explaining the ending. If you want to preserve the story, read only the section for the location you have reached. The most useful early checks are the opening bedroom photography, all purchases at Karl's Pump 'n' Mart, and letting Milton finish his speeches before taking the products he discusses.
Hidden status and optional status are different
A platform can conceal an achievement's description because it reveals a future story event. Those achievements are still part of normal progression. Other concealed entries reward an extra action that the story does not force you to perform. A third possibility is a repeated activity whose condition is simple once you know the number.
Do not use the hidden icon alone to decide whether you need to restart. Read the revealed requirement and match it to your current location. If the action belongs to a previous stop, keep it on a replay list; chapter select is available after finishing the story. If the condition spans the journey, such as all rest opportunities, plan around the complete route rather than one isolated scene.
| Kind of requirement | Example | How to approach it |
|---|---|---|
| Story progression | Before I Forget Myself | Continue the relevant journey objective |
| A specific photograph | Chrono Selfie | Use the correct camera mode and include Milton |
| Dialogue behavior | Patience Of A Saint | Let the relevant sales speeches finish |
| Optional product set | Shopaholic | Buy the extra products as well as the main supplies |
| An unusual interaction | Stupid Thing! | Repeat the kitchen drawer sequence |
| A score challenge | Guardian Lord | Beat the record rather than merely playing |
| A complete route | Old Bones | Rest at every opportunity during the journey |
Snooping Shutterbug: investigate the opening room
Snooping Shutterbug requires a photo of every curious object in Alfred's room. The opening photography sequence teaches you how to use the camera, but you should complete the room search before taking the photograph that advances the scene outside the window.
The camera manual, teddy bear, wall photographs around the desk, and calendar are useful targets to check. Aim at each subject deliberately. Taking several pictures of the same teddy does not solve a missing calendar photograph, even though each shutter press feels like photography progress.
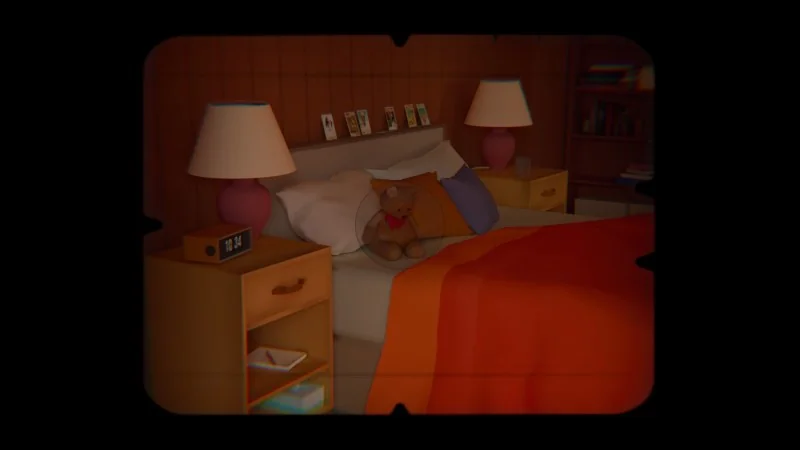
The name points toward curiosity rather than a particular number of ordinary photos. This is why the achievement needs its own room checklist. Focus Finder and Picture Perfect are broader photo counts; Snooping Shutterbug belongs to this opening space and its curious objects.
When Alfred calls from outside and poses, you have an obvious progression prompt. Finish your object pictures first, then take the portrait. This order preserves the opportunity to complete the room task while moving naturally through the tutorial.
Patience Of A Saint: listen before taking the items
Milton is the cashier at Karl's Pump 'n' Mart. Patience Of A Saint is described as “One does not simply interrupt Milton.” The practical requirement is tied to his sales dialogue when you examine the road atlas and windshield wipers.
Let him finish speaking before taking each of those products. Waiting is an action here: the game offers the chance to continue shopping, but using that opportunity while he is still talking is the behavior the achievement asks you to avoid.
This should not be confused with standing motionless somewhere in the store for a long time. You need the relevant item conversations, and you need to let them finish. Check the atlas interaction and wiper interaction individually before completing the purchase.
If you are also working on Shopaholic, use the same visit to collect the optional products. The two achievements complement each other but have separate conditions. Listening patiently does not prove you purchased every item, and buying every item does not prove you allowed each speech to finish.
Shopaholic: go beyond the road-trip essentials
The main shopping route requires cookies, windshield wipers, and a road atlas. Shopaholic asks you to buy all the things at Karl's Pump 'n' Mart, so those required supplies are only part of the task.
Check chips, canned goods, an air freshener, a shirt, and a sticker as well. Use the basket and finish the store search before settling the transaction. A systematic aisle pass is easier than guessing which optional purchase you skipped after the chapter has moved on.
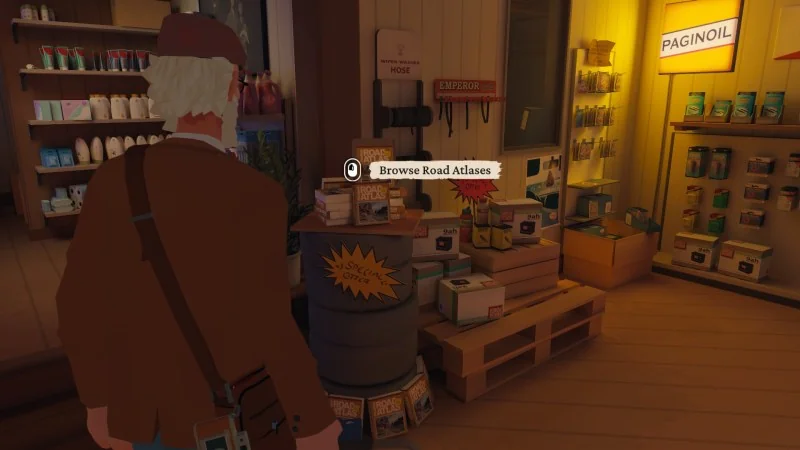
The store's many shelves can make the requirement look like a search for an arbitrary hidden object. It is more concrete than that: finish the available product interactions, including the optional purchases. Keep the complete shopping task separate from the vignette petals outside and the available rest seats, which belong to different achievements.
Chrono Selfie: make the photograph a shared selfie
Chrono Selfie requires a selfie with Milton. A normal photograph of him behind the counter is not the condition. Switch to selfie mode so Alfred appears in the foreground and include Milton in the same frame.
You do not need to turn this into a search for a secret camera upgrade. The complication is that the shop is an early stop, while you may become more familiar with selfie use later. If you passed the store before noticing the mode, chapter replay provides a focused return after the story.
Check the framing before pressing the shutter. A selfie of Alfred alone is useful for the separate ten-selfie milestone but is not the companion-specific picture. Likewise, a photograph of the store shelves, wall decorations, or road atlas does not stand in for Milton.
The achievement's 80 Epic XP makes it appear alongside more involved goals, but the condition remains a single correct photograph. Concentrate on mode and subject rather than assuming its reward value implies multiple hidden steps.
Hatless: take the optional nap and continue the local sequence
Hatless describes losing Alfred's hat while taking a nap. This is a rest-related task around the Highway Star Diner section. Complete the optional nap instead of treating the outdoor seating as scenery to pass on the way to the main restaurant objectives.
The hat sequence continues with the outside investigation associated with the diner. Follow that interaction rather than assuming every related condition must be finished immediately after you sit down. If Alfred is still involved in the local hat story, continue it before leaving the area.
This overlap is useful for an achievement run: a rest opportunity can also lead to an unusual optional event. However, Hatless and Old Bones are not interchangeable. The nap concerns one local sequence; Old Bones needs all rest opportunities across the route.
Do not wait for a hidden description to tell you every place to sit. Check available seating as you explore, and perform the interaction while you are nearby. The diner includes three rest opportunities in the completion route, so one successful nap is not proof that you have finished the location's entire rest checklist.
Stupid Thing!: repeat the broken-drawer interaction
In Sam's house, Stupid Thing! concerns the broken kitchen drawer. Close the drawer, leave the kitchen, then return when it has opened again. Repeat the sequence until you have closed it five times.
This is not a repair puzzle requiring a tool from a later chapter. The quotation marks around “fix” reflect the repeated attempt to keep the drawer shut. Perform the actual closing interaction rather than only examining or photographing it.
It is easiest to keep the attempts together while exploring the house. If you leave the kitchen once and continue directly to the van-repair objective, you can overlook that the drawer has reopened. Returning is part of the task, not an indication that the previous closing action failed to register.
Keep Green Thumb separate when you later help Sam with the plants. That challenge requires beating her watering result; closing the drawer has no effect on the gardening competition. These are two optional achievements in the same general chapter, with different success conditions.
Resort secrets: distinguish papers, souvenirs, and the arcade
At Captain Marley & The Buccaneers' Retreat, Scallyrat Roberts asks you to learn what led to the resort's collapse. Search the notes and newspaper clippings while you still have access to the resort, before leaving for the boat. The completion route includes eight pieces of written material.
The Plundered Plumage has a different object: Marley's bobblehead. Once the bolt cutter makes additional locked spaces accessible, return toward the entrance area and inspect the available interior. Do not confuse the bobblehead with the mascot tickets collected for the main story.
Guardian Lord is a performance condition rather than a collectible. Beat the arcade's high score. The narrative objective can move forward after merely playing the game, even with a lower score, so objective completion is not proof that the achievement unlocked.
The boat also has an optional action: Bowside 360 requires a complete 360-degree spin. Do the movement task before steering only toward the island. These resort achievements reward separate behaviors, and none of them replaces the area's vignette or rest checks.
Short descriptions with exact numbers
Several achievement descriptions remove ambiguity by giving you a number. Self-Portrait Photography asks for 10 selfies; Focus Finder asks for 25 photos; Picture Perfect asks for 50 photos; Olympic-Level Stick Thrower asks for three fetch rounds; and Shaun and Jason asks for at least 30 calls for Doggo during the climb.
Use those numbers as action counts rather than story milestones. A journal page holding a few favorite photos is not the same as your total shutter count. Finding Doggo at the end of a search is not the same as calling enough times. Throwing one stick is not automatically three rounds of fetch.
This helps with hidden entries because a mysterious name can make a simple condition feel more complex than it is. Reveal the requirement, note whether it counts pictures, selfies, fetch rounds, or calls, and perform that particular action in the appropriate scene.
Keep story spoilers separate from cleanup
Before I Forget Myself, Trip's Cancelled, Back On The Road, Have a Swantastic Day, What's In A Name, Alright, First Coffee, and You Can't Plan Life correspond to significant parts of Alfred's journey. You can track whether they have unlocked without needing a detailed explanation of the story event behind every title.
For a spoiler-conscious first run, concentrate your checklist on optional actions: room objects, Milton's speech and purchases, rest spots, vignettes, the drawer, the arcade record, and specific camera subjects. Let the main journey supply its own milestones.
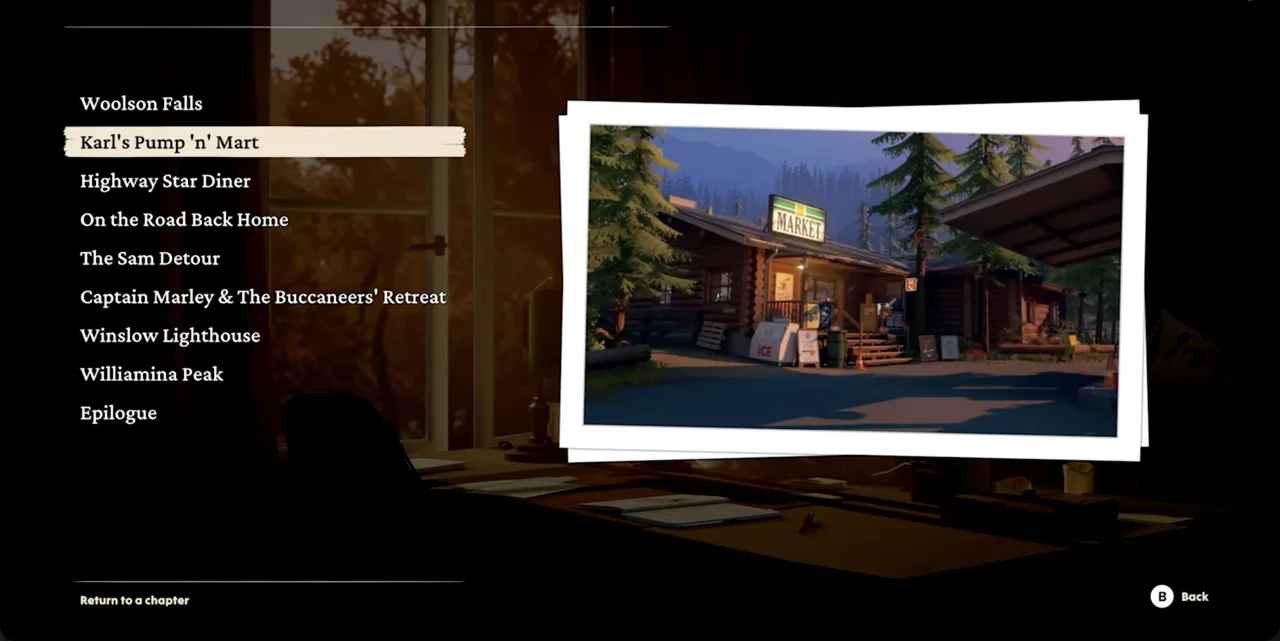
After completing the story, use the chapter menu to revisit a local task that remains locked. Check the actual achievement requirement before replaying: Milton's selfie needs the store, a bedroom object needs the opening, and a resort score needs the arcade. Hidden status is a presentation choice; the concrete action tells you where to go and what to do next.